
Wednesday, 30 November 2011
END OF BLOG

Tuesday, 12 July 2011
Wednesday, 6 April 2011
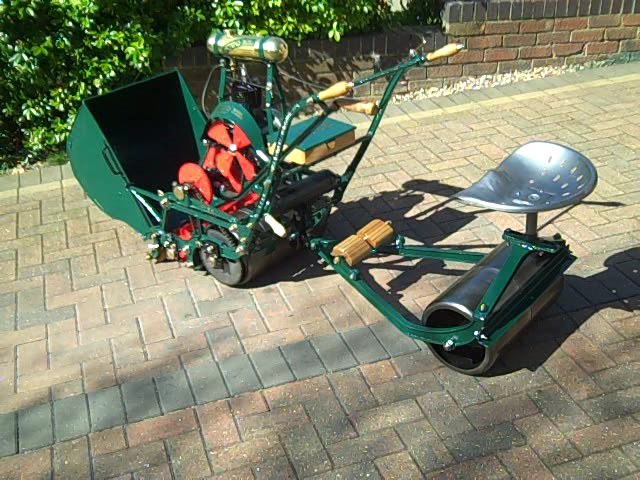
AS FINISHED AS IT EVER WILL BE.


Monday, 28 March 2011
IT'S LIFE JIM BUT NOT AS WE KNOW IT !
The new carb cable and freed-off compressor have been fitted and I’ve spent the weekend adjusting, setting and fiddling about with just about everything on this machine to get her up and running. After a great deal of frustration I managed to get her to resemble something akin to life albeit for only 10 to 15 seconds and with a not inconsiderable amount of puffing, banging and general reluctance to run smoothly.
The mechanic who works on the machines in my business called by and observed that the spark was weak and although he could trace the problem he did indicate his reservations about getting the machine up and running even for a short period without all the drive chains and myriad of other moving parts being thoroughly oiled and greased beforehand - understandably.
As I indicated at the very beginning of this blog it has been my primary intention to restore this machine specifically for display purposes so I’m loath to have her run for any length of time inevitably resulting in splattering oil and grease everywhere. I’m satisfied that the Atco works but will decide later whether to attempt to have her running 100% smoothly – even if were possible.
In the meantime there’s another pressing matter. I’m anxious to photo and video the machine for including here but feel that the backdrop of my ‘modern’ driveway and house would be a wholly inappropriate setting. So I’m on the lookout for a Lutyens or similar period property and lawn more befitting the 1920’s era when this machine was made.
Saturday, 19 March 2011
DEJA VU
I'm having a new carb cable made up by Mr Cruse who at the same time has managed to free up the seized decompressor - it defeated me even after a week soaking in penetrating fluid. I've fitted the flywheel and set it correctly and also adjusted the points to a 15 thou gap.
Whilst waiting I checked over the machine which has been stored in my garage all winter. Sadly the rear roller had rusted over so has been removed and once again will need to be cleaned up with a rotary wire brush. The mistake I made in the autumn was that after lacquering the roller I gave it a spay coating of WD40 thinking this would act as a barrier to dampness. Well it had the exact opposite effect ! WD40 is a penetrating fluid and evaporates over time so it's dissolved the lacquer, evaporated and then exposed the bare metal - hence the rust.
This time I'll leave the roller with just the lacquer finish and maybe wipe over with a thin oil.
 I appreciate that I could be viewed as being too fastidious but with the machine now looking virtually as new a rusty roller would detract and 'spoil the ship'
Whilst waiting I checked over the machine which has been stored in my garage all winter. Sadly the rear roller had rusted over so has been removed and once again will need to be cleaned up with a rotary wire brush. The mistake I made in the autumn was that after lacquering the roller I gave it a spay coating of WD40 thinking this would act as a barrier to dampness. Well it had the exact opposite effect ! WD40 is a penetrating fluid and evaporates over time so it's dissolved the lacquer, evaporated and then exposed the bare metal - hence the rust.
This time I'll leave the roller with just the lacquer finish and maybe wipe over with a thin oil.

Wednesday, 2 March 2011
IS HE STILL ALIVE ? !!!
I'm here again after a winter of chronic back pain and other distractions.
I've managed to resolved a couple of the minor mechanical issues but will be seeking more experienced professional help to finally have this machine up and running. Hopefully I'll be posting again by the end of the month.
I've managed to resolved a couple of the minor mechanical issues but will be seeking more experienced professional help to finally have this machine up and running. Hopefully I'll be posting again by the end of the month.
Monday, 17 January 2011
MESSAGE FROM MRS GRASS

Over Christmas Roy caught a cold, just as he was on the mend it returned with a vengeance and has now developed into a severe chest infection. And with a depleted immune system he should have known better, all no doubt due to spending weeks on end working in our freezing garage. So I’ve banned him from returning to his mower project until he’s again firing on all cylinders.
That apart he’s asked that I post a photo of the grassbox which he insisted on finishing even when poorly.
Men!
Thursday, 23 December 2010
SEASONS GREETINGS
A happy Christmas and peaceful new year to all following my blog.
Baring some mechanical tweaking this restoration is complete and I’m anxious to show some photos of the finished article but for the moment this is proving impossible. Although well lit there’s no room to photograph the mower with the ride-on attachment in my garage and outside we’re still under several inches of snow. I’m awaiting a clear sunny day but not holding my breath !
Back in the new year.
Sunday, 19 December 2010
VIDEOS
At long last I've managed to add a couple of videos to this blog.
The first has been included in my post of Sunday 14th November 2010 regarding the problem I was having with the frame alignment. This is of course now history as the problem was resolved. The second brief video has been added to my post of Sunday 7th November 2010 and shows the rear roller being de-rusted prior to lacquering.
Work on the grassbox is now finished, I'm awaiting a transfer and then a photo will be posted.
The first has been included in my post of Sunday 14th November 2010 regarding the problem I was having with the frame alignment. This is of course now history as the problem was resolved. The second brief video has been added to my post of Sunday 7th November 2010 and shows the rear roller being de-rusted prior to lacquering.
Work on the grassbox is now finished, I'm awaiting a transfer and then a photo will be posted.
Sunday, 12 December 2010
MORE WORK ON THE BOX

I’ve now finished preparing the grass box ready for painting. This has taken much longer than anticipated. I used Plastic Padding Chemical Metal as a filler over the small irregularities which I had previously used on other projects. As a metal to metal adhesive and although obviously not as strong as welding I would certainly recommend it for non load bearing joints or where ferrous and non ferrous metals need to be jointed. As a filler however it sets far too hard and is a devil of a job to sand down. Anyway after a great deal of elbow grease the box is now as smooth as I can get it and will have to be brought indoors for painting this coming week.
Sunday, 5 December 2010
WORKING ON THE GRASS BOX

With my garage now a barmy +2 deg C I’ve spent today preparing the grass box. A few areas have filler and this has been rubbed down and smoothed. One panel on the front face is just a bit lumpy and bumpy so I’m trying to hammer this flat but as I’m no panel beater I may only succeed in converting a few small bumps into numerous tiny ones as in a planished effect.
As the box has a matt finish in what I think is red oxide primer the bumpy section doesn’t show clearly enough to photo but certainly would be apparent when gloss painted. As I attempt to smooth the panel I’m wetting the surface to show up the irregularities ( plus my poor panel beating!) but if my efforts don’t succeed I may resort to layering a piece of thin aluminium over the irregular area.
This prep’ing of the grass box will take a while and it’s far too cold for painting so I’ll only post again when there’s some progress to report.
Thursday, 2 December 2010
AL GORES GONE QUIET
8am 2/12/10 update from last nights post. We’re now under 11” of snow with more falling as I type and forecast to continue for the rest of the day. If I don’t post again within a couple of days could someone please organise a rescue party – me first then the Atco and finally Mrs Grass.
Anyway I digress. Helping push the van driver out of the snow yesterday should have been the last thing to do given my back problems but miraculously this morning I’m pain free so something must have clicked back into place. I may even venture into the freezer which is my garage to start work on the grass box. Or maybe not!
Wednesday, 1 December 2010
CHRISTMAS BOX ? NO, GRASS BOX !

A follower –topgunhorse- has very kindly given me his grass box and, furthermore, gone to great lengths even to have it delivered. I really am most grateful. Here on Epsom Downs we’re under a good 6” of snow (correction now 8") and it only took an hour and a half to push the delivery van the 30 yards to the top of the Close ! So my sincere appreciation also goes to the driver who may not yet have thawed out.
The box is in remarkable condition given its age but I may resort to some minor metal bashing, painting etc but not ‘till the weather improves as my enthusiasm for this restoration doesn't extend to working on frozen steel in my arctic garage. As I posted earlier this project is on ice – now literally.
Weather permitting this should keep me busy over the Christmas break and anyway what else would I be doing – eating, drinking and making merry ? No thanks, bah humbug!
Sunday, 28 November 2010
NORMAL SERVICE WILL BE RESUMED AS SOON AS POSSIBLE

I have a longstanding lower back complaint – degenerative disc disease – which behaves just like rheumatism; when it’s warm and dry I can live with it but the moment the weather turns cold and damp I can be virtually paralysed for days or weeks on end. It's not at that stage yet but for the moment it’s even a struggle to type this post so just as the project is nearing completion this restoration is ‘on ice’ ‘till I’m fit enough to attend to the finishing touches.
Tuesday, 23 November 2010
WHERE DO THESE GO ?

Somewhere earlier in this blog I’ve mentioned that at the conclusion of every restoration I’ve ever undertaken there’s a grommet, widget or whatever left over with no apparent home. Well this Atco restoration is no exception. The photo shows two flat plates roughly 2” x 1” which I think may have something to do with the fuel tank mounting brackets but having looked very carefully at the video I took during dismantling their location is nowhere to be found. The machine hasn’t yet collapsed so they can’t be that important but any suggestions would be appreciated.
Monday, 22 November 2010
FOLLOWER TO THE RESCUE!
Fortuitously a follower of this blog had saved the photo that had disappeared from my post of 14th September. He’s kindly emailed the picture which I’ve now saved on my computer and reinstated on the post of that date.
Sunday, 21 November 2010
TRICKY TRANSFERS
I’ve received the three new transfers ordered from the OLMClub as well as a couple bought through ebay. The tool box should have the circular Chas. H Pugh transfer on the lid (at least that what was on the machine when bought) but I preferred the large Atco name version. This was applied without a problem as detailed instructions were sent by the ebay seller. There was no ‘home’ for the small Atco name transfer so I decided to stick it to the rear cross member of the ride-on attachment. And what a hash I made of it ! As I was peeling off the backing paper the transfer creased and attempts to smooth it out only produced even more creases and tares so the remnants were removed and discarded.
The correct (so I’m informed) transfer for either side of the fuel tank is the gold Atco name sticker which is fine against a green background but as my tank is polished brass the gold transfer would be ‘lost’ so I ordered the green ‘tank’ transfer which I think looks more prominent.
A word of caution to anyone not used to applying transfers. (ie moi !)
To my knowledge there are at least three types of transfers, or should I say means of applying, so be certain first which you have as mistakes cannot be rectified afterwards. The two purchased via ebay are the type where on the face side the lettering shows in reverse (ie mirror image) and these need to be wetted, applied ‘up side down’ – also to a dampened surface - after which the backing paper which is uppermost carefully peeled off leaving the transfer on the surface which then may need to be smoothed over to remove bubbles and creases as in wallpapering. Others are simply stick-on where the backing paper is first removed to expose the sticky underside and then pressed onto the surface. Finally another type has backing paper on both sides and is applied by first removing the underside paper, applied to the surface followed by very carefully peeling off the backing paper from the face side.
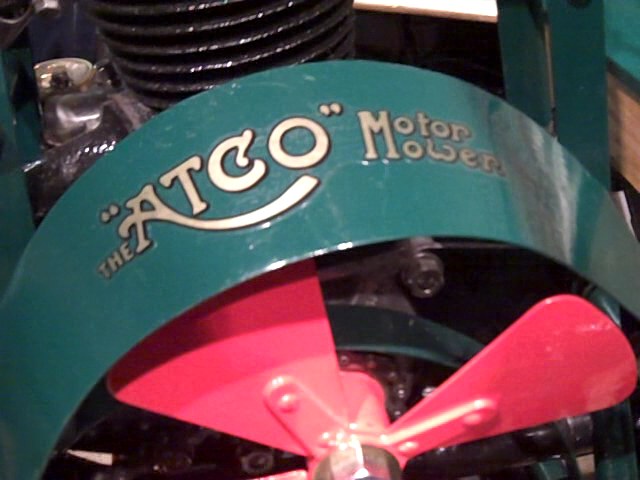


This all may sound obvious to those in the know but I wasn’t and I’m somewhat surprised fitting instructions aren’t included with some of the transfers.
UPDATE

I’ve found some 5/8” ID x 1/8” thick washers and added these alongside the existing spacers. The gap between the rollers is now fractionally more than it should be but maybe I’m being too pedantic.
As with the rear roller I’ve fitted rubber sleeves around the new oak front rollers as protection but that’s necessitated removing the scraper bar whilst these sleeves are in place.
GOT BY THE SHORT AND CURLIES
Monday 15/11. At the end of this blog at the conclusion of the restoration I will include a credits list – those supplies I have used throughout the restoration but I will not be acknowledging the (expletive) from whom I ordered the new oak turnings. He was sent a detailed spec and drawing of the rollers and handles from which he gave a written, fixed, all inclusive price and ten day turn around time. He was also sent one of the roller brass inner sleeves and an old oak handle as a pattern to work from. Now two months later he hasn’t even started the job and wants more money. Yes I could tell him to ….. (you know what) but then he won’t return the items I sent as patterns and I’ll have another wait ordering elsewhere. I’m minded to let him proceed and when finished refuse to pay the extra but that’s dishonest and not my style. When I quote a client I stick to it even if we only cut even.


Update, Friday 19/11. The oak rollers and handles eventually arrived yesterday. The handles are fine but the rollers are each 1/8” too short. I had sent the turner one of the 3 7/8” long brass inner sleeves as a pattern only so that the centre hole would be machined to take the sleeve as a push fit but, contrary to the 4” long roller length given on my drawing, he’s used the sleeve length as a pattern for the length of the rollers. These sleeves are 1/8” shorter than the roller to ensure that the spacer washers sit against the side wall of the roller and not the sleeve. 1/8” doesn’t sound much but with five rollers there’s now a 5/8” gap at the end of the roller shaft. This will have to be ‘taken up’ with thicker spacers (which won’t look right) or a 5/16” collar at each end of the shaft. More unnecessary work !

I SHOULD STICK TO GARDENING!
In my post of 14th September I included photos of the the Atco with the ride-on attachment when purchased and these have now disappeared! I copied these from the ebay listing and pasted them into this blog but about 90 days after the auction end the listing with the photos is removed which in turn has removed them from my blog. Only now I learn that I should have copied them to 'my pictures' on my computer as a permanent record. Moreover the ebay seller also no longer has the photos which is understandable. I'm fairly good with horticulture but !*£$! useless with computers! Never mind we all learn from our mistakes.
See update 22nd November.
See update 22nd November.
Subscribe to:
Posts (Atom)